Increasing Production Throughput with LaserPro Driver Settings | GCC: Laser Machines Leader Since 1989
English
Knowledge Base
| Throughput is an essential attribute that manufacturers take into consideration when selecting laser engravers. Therefore if speed competence matches or exceeds required expectations, it will be preferred. | ||||
| There are several ways to improve production efficiency, it can be achieved through equipment upgrade, or acquire more advanced optional features, but both methods entail extra monetary imbursement. Problems will arise when manufacturers are often challenged with the dilemma to improve efficiency with a limited budget. | ||||
| This month Hot Tips will show you various tips on how to improve production efficiency with ease through Driver settings. | ||||
| 1. Adjust dpi(dot per inch) value | ||||
| Dpi (dots per inch) is a measurement used for dot matrix figures; in particular it represents the number of individual dots that can be placed within the span of one linear inch (2.54cm). Laser Engravers can work with 125~1000dpi for assigned tasks. | ||||
 | ||||
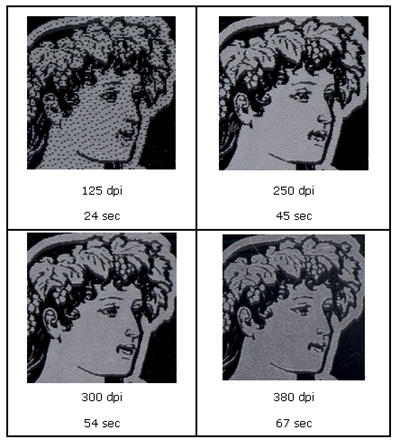
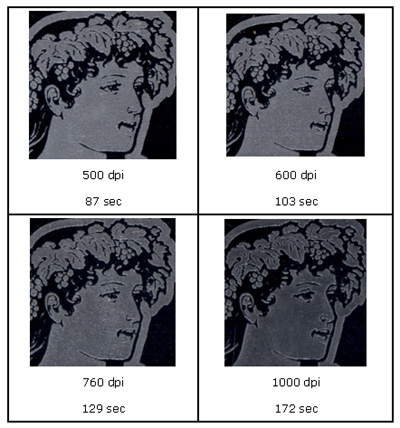
| Higher dpi settings will produce refined and more detailed output, but will require longer working time. Please select appropriate dpi settings to match your resource materials as too high or too low of dpi will affect final product. Here below we have engraved identical graphics but used different dpi settings for comparison of working time and output quality. | ||||
 | ||||
 | ||||
| Hot Tips | ||||
| - Different dpi settings with corresponding working time and graphic quality | ||||
| Hot Tips | ||||
| Even though users can self-adjust dpi settings, but not all applications are suitable for modifying dpi values to shorten working time, too low dpi settings may give coarse final output. | ||||
| Applicable for: | ||||
| Dot matrix figures, Vector engravings, and Vector cuttings. | ||||
| 2. SmartACT | ||||
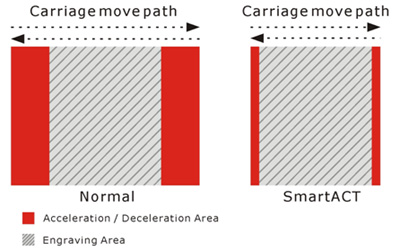
| When conducting Laser engraving, working object’s left and right-hand regions would have an acceleration/deceleration zone, used for lens carriage to either speed up or slow down. SmartACT’s main function is to maintain a steady movement and shorten the gap of the acceleration and deceleration zone, thus to effectively cut down working time. As shown below, the gray area represents the actual laser processing area, and the red area represents the acceleration and deceleration zone. | ||||
 | ||||
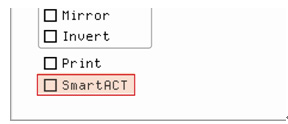
| On the Options page, please select SmartACT to activate SmartACT functions. | ||||
 | ||||
| Now we have used a graphic with dimensions of 8 inch * 10 inch for testing. Given identical speeds, engraving with SmartACT actually saves 2 minutes of working time. | ||||
| ||||
| When users are challenged with increased volumes of tasks, SmartACT will be able to save you even more working time accumulatively. LaserPro would also like to remind you that although using the SmartACT is able to shorten the gap of the acceleration and deceleration zone, the quality of engraving would be slightly affected. The two graphics below will show you comparative differences to illustrate this even though such discrepancy will not be easily detected by the human eye. | ||||
 | ||||
| Hot Tips | ||||
| Using SmartACT may improve working time but it could slightly affect the final output, please be advised to use SmartACT only when required. | ||||
| Applicable for: | ||||
| Dot matrix applications or Vector Engravings. | ||||
| 3. Activate Optimization Sorting | ||||
| The order of laser engraving tasks is sequenced according to graphic designer’s sketching arrangements. Therefore, when designers draw in an unorganized manner, laser engraving tasks would take longer than necessary. Please refer to the following example: | ||||
 | ||||
| Laser Engraving tasks are conducted in the order of the numbers given; duplicative movements would be required to go back and forth, adding unnecessary working time. However, for designers to sketch in an orderly sequence actually poses great challenges. Here Optimization Sorting function delivers the solution to effectively organize working tasks in a sequential order, shown below: | ||||
 | ||||
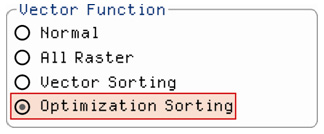
| When Optimization Sorting is activated, working objects will be rearranged and will be worked-on in a sequential order; this will eliminate unnecessary movements to shorten working time. In Driver settings, at the Advance window, click to select Optimization Sorting, then this function will be activated. | ||||
|
| ||||
| Hot Tips: | ||||
| This mode is only applicable for vector figures, not suitable for dot matrix graphics. | ||||
| Applicable for: | ||||
| Vector figures or Vector cuttings. | ||||
| Conclusion Using the simple steps illustrated above, users will be able to shorten working time and enhance production efficiency. LaserPro would like to remind you that certain features may inadvertently affect overall quality of output, thus please adjust parameters accordingly and take caution to minimize unnecessary resource media waste. | ||||

